
6 posts tagged with "deployment"

View All Tags

Vulkan Support: LLMs for Everyone

· 2 min read

It has long been the case that machine learning models are run on the GPU to improve their performance. The GPU is far more effective at the kinds of computations needed for AI than the CPU, and so GPU compute libraries such as Cuda and ROCm are typically used.

However, requiring the support of these libraries can restrict which graphics cards are compatible, leaving many with older or less popular cards unable to run LLMs efficiently.

Tabby is happy to announce that we now support Vulkan, a graphics library created primarily for games. Its original purpose means that it is designed to work on a very broad range of cards, and leveraging it to host LLMs means that we can now offer GPU acceleration to people whose cards are not supported by Cuda and ROCm.

Vulkan works on basically any GPU, so if you have previously been forced to host local models on your CPU, now is the time to see what Tabby with Vulkan can do for you!

Vulkan Installation

To begin, first make sure that you have Vulkan installed.

For Windows users, Vulkan may be natively supported. Otherwise, the Vulkan SDK can be downloaded at https://vulkan.lunarg.com/sdk/home#windows.

For Linux users, Vulkan can be installed through your package manager:

  • Arch Linux: vulkan-icd-loader (universal), and also install vulkan-radeon (for AMD) or vulkan-nouveau (for Nvidia)
  • Debian Linux: libvulkan1

Vulkan installed on Arch Linux

Tabby Installation

To start using Tabby with Vulkan, first download one of the pre-built Vulkan binaries for your platform:

Running

Once you've installed the appropriate binary, you can simply run it from the command line:

For Windows, open a command prompt and navigate to the download folder, then run:

tabby_x84_64-windows-msvc-vulkan serve --model StarCoder-1B --device vulkan

For Linux:

./tabby_x64_64-manylinux2014-vulkan serve --model StarCoder-1B --device vulkan

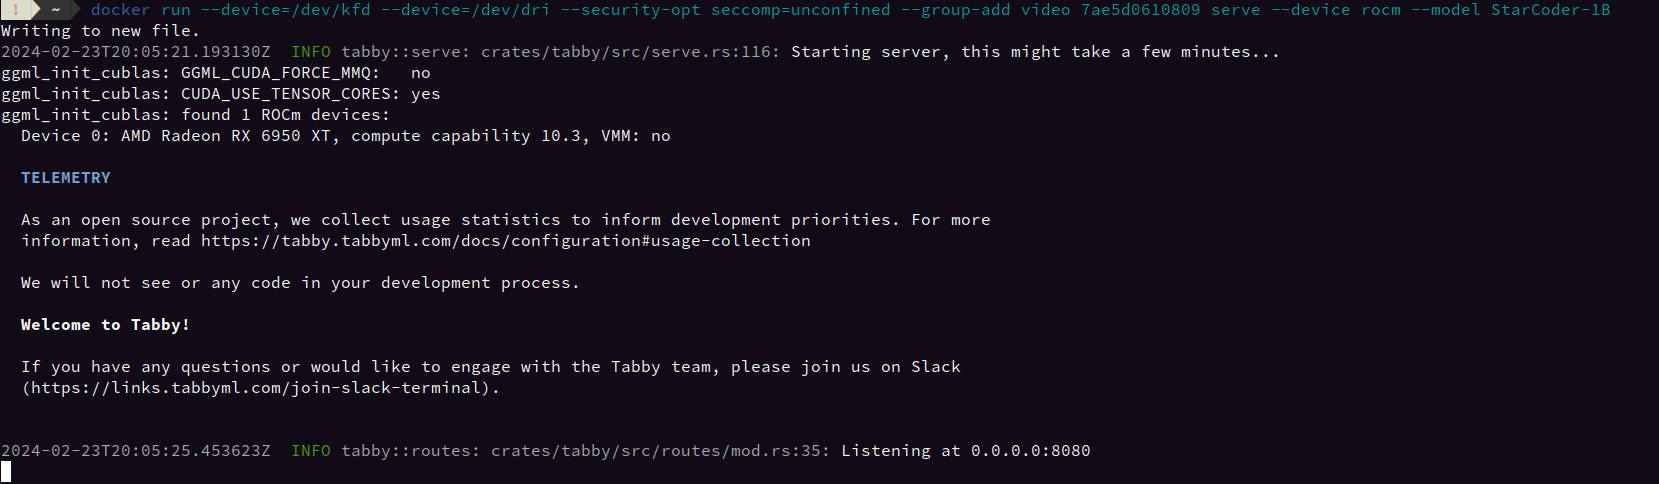
When it starts, you should see a printout indicating that Vulkan has found your card and is working properly:

Vulkan running on Linux

Now enjoy your speedy completions!

Completion example

Connect Private GitHub Repository to Tabby

· 5 min read

A few months ago, we published a blog Repository context for LLM assisted code completion, introducing the Repository Context feature in Tabby. This feature has been widely embraced by many users to incorporate repository-level knowledge into Tabby, thus improving the relevance of code completion suggestions within the working project.

In this blog, I will guide you through the steps of setting up a Tabby server configured with a private Git repositories context, aiming to simplify and streamline the integration process.

Generating a Personal Access Token

In order to provide the Tabby server with access to your private Git repositories, it is essential to create a Personal Access Token (PAT) specific to your Git provider. The following steps outline the process with GitHub as a reference:

  1. Visit GitHub Personal Access Tokens Settings and select Generate new token. GitHub PAT Generate New Token
  2. Enter the Token name, specify an Expiration date, an optional Description, and select the repositories you wish to grant access to. GitHub PAT Filling Info
  3. Within the Permissions section, ensure that Contents is configured for Read-only access. GitHub PAT Contents Access
  4. Click Generate token to generate the new PAT. Remember to make a copy of the PAT before closing the webpage. GitHub PAT Generate Token

For additional information, please refer to the documentation on Managing your personal access tokens.

Note: For users of GitLab, guidance on creating a personal access token can be found in the documentation Personal access tokens - GitLab.

Configuration

To configure the Tabby server with your private Git repositories, you need to provide the required settings in a YAML file. Create and edit a configuration file located at ~/.tabby/config.yaml:

## Add the private repository
[[repositories]]
name = "my_private_project"
git_url = "https://<PAT>@github.com/icycodes/my_private_project.git"

## More repositories can be added like this
[[repositories]]
name = "another_project"
git_url = "https://<PAT>@github.com/icycodes/another_project.git"

For more detailed about the configuration file, you can refer to the configuration documentation.

Note: The URL format for GitLab repositories may vary, you can check the official documentation for specific guidelines.

Building the Index

In the process of building the index, we will parse the repository and extract code components for indexing, using the parser tree-sitter. This will allow for quick retrieval of related code snippets before generating code completions, thereby enhancing the context for suggestion generation.

tip

The commands provided in this section are based on a Linux environment and assume the pre-installation of Docker with CUDA drivers. Adjust the commands as necessary if you are running Tabby on a different setup.

Once the configuration file is set up, proceed with running the scheduler to synchronize git repositories and construct the index. In this scenario, utilizing the tabby-cpu entrypoint will avoid the requirement for GPU resources.

docker run -it --entrypoint /opt/tabby/bin/tabby-cpu -v $HOME/.tabby:/data tabbyml/tabby scheduler --now

The expected output looks like this:

icy@Icys-Ubuntu:~$ docker run -it --entrypoint /opt/tabby/bin/tabby-cpu -v $HOME/.tabby:/data tabbyml/tabby scheduler --now
Syncing 1 repositories...
Cloning into '/data/repositories/my_private_project'...
remote: Enumerating objects: 51, done.
remote: Total 51 (delta 0), reused 0 (delta 0), pack-reused 51
Receiving objects: 100% (51/51), 7.16 KiB | 2.38 MiB/s, done.
Resolving deltas: 100% (18/18), done.
Building dataset...
100%|████████████████████████████████████████| 12/12 [00:00<00:00, 55.56it/s]
Indexing repositories...
100%|████████████████████████████████████████| 12/12 [00:00<00:00, 73737.70it/s]

Subsequently, launch the server using the following command:

docker run -it --gpus all -p 8080:8080 -v $HOME/.tabby:/data tabbyml/tabby serve --model StarCoder-1B --device cuda

The expected output upon successful initiation of the server should like this:

icy@Icys-Ubuntu:~$ docker run -it --gpus all -p 8080:8080 -v $HOME/.tabby:/data tabbyml/tabby serve --model StarCoder-1B --device cuda
2024-03-21T16:16:47.189632Z INFO tabby::serve: crates/tabby/src/serve.rs:118: Starting server, this might take a few minutes...
2024-03-21T16:16:47.190764Z INFO tabby::services::code: crates/tabby/src/services/code.rs:53: Index is ready, enabling server...
ggml_init_cublas: GGML_CUDA_FORCE_MMQ: no
ggml_init_cublas: CUDA_USE_TENSOR_CORES: yes
ggml_init_cublas: found 1 CUDA devices:
Device 0: NVIDIA GeForce RTX 4090, compute capability 8.9, VMM: yes
2024-03-21T16:16:52.464116Z INFO tabby::routes: crates/tabby/src/routes/mod.rs:35: Listening at 0.0.0.0:8080

Notably, the line Index is ready, enabling server... signifies that the server has been successfully launched with the constructed index.

Verifying Indexing Results

To confirm that the code completion is effectively utilizing the built index, you can employ the code search feature to validate the indexing process:

  1. Access the Swagger UI page at http://localhost:8080/swagger-ui/#/v1beta/search.
  2. Click on the Try it out button, and input the query parameter q with a symbol to search for.
  3. Click the Execute button to trigger the search and see if there are any relevant code snippets was found.

In the screenshot below, we use CodeSearch as the query string and find some code snippets related in the Tabby repository:

Code Search Preview

Alternatively, if you have utilized the code completion with the constructed index, you can examine the server log located in ~/.tabby/events to inspect how the prompt is enhanced during code completion.

Additional Notes

Starting from version v0.9, Tabby offers a web UI to manage your git repository contexts. Additionally, a scheduler job management system has been integrated, streamlining the process of monitoring scheduler job statuses. With these enhancements, you can save a lot of effort in maintaining yaml config files and docker compose configurations. Furthermore, users can easily monitor visualized indexing results through the built-in code browser. In the upcoming v0.11, a new feature will be introduced that enables a direct connection to GitHub, simplifying and securing your access to private GitHub repositories.

For further details and guidance, please refer to administration documents.

Tabby with Replicas and a Reverse Proxy

· 3 min read

Tabby operates as a single process, typically utilizing resources from a single GPU.This setup is usually sufficient for a team of ~50 engineers. However, if you wish to scale this for a larger team, you'll need to harness compute resources from multiple GPUs. One approach to achieve this is by creating additional replicas of the Tabby service and employing a reverse proxy to distribute traffic among these replicas.

This guide assumes that you have a Linux machine with Docker, CUDA drivers, and the nvidia-container-toolkit already installed.

Let's dive in!

Creating the Caddyfile

Before configuring our services, we need to create a Caddyfile that will define how Caddy should handle incoming requests and reverse proxy them to Tabby:

Caddyfile
http://*:8080 {
handle_path /* {
reverse_proxy worker-0:8080 worker-1:8080
}
}

Note that we are assuming we have two GPUs in the machine; therefore, we should redirect traffic to two worker nodes.

Preparing the Model File

Now, execute the following Docker command to pre-download the model file:

docker run --entrypoint /opt/tabby/bin/tabby-cpu \
-v $HOME/.tabby:/data tabbyml/tabby \
download --model StarCoder-1B

Since we are only downloading the model file, we override the entrypoint to tabby-cpu to avoid the need for a GPU

Creating the Docker Compose File

Next, create a docker-compose.yml file to orchestrate the Tabby and Caddy services. Here is the configuration for both services:

docker-compose.yml
version: '3.5'

services:
worker-0:
restart: always
image: tabbyml/tabby
command: serve --model TabbyML/StarCoder-1B --device cuda
volumes:
- "$HOME/.tabby:/data"
deploy:
resources:
reservations:
devices:
- driver: nvidia
device_ids: ["0"]
capabilities: [gpu]

worker-1:
restart: always
image: tabbyml/tabby
command: serve --model TabbyML/StarCoder-1B --device cuda
volumes:
- "$HOME/.tabby:/data"
deploy:
resources:
reservations:
devices:
- driver: nvidia
device_ids: ["1"]
capabilities: [gpu]

web:
image: caddy
volumes:
- "./Caddyfile:/etc/caddy/Caddyfile:ro"
ports:
- "8080:8080"

Note that we have two worker nodes, and we are using the same model for both of them, with each assigned to a different GPU (0 and 1, respectively). If you have more GPUs, you can add more worker nodes and assign them to the available GPUs (remember to update the Caddyfile accordingly!).

Starting the Services

With the docker-compose.yml and Caddyfile configured, start the services using Docker Compose:

docker-compose up -d

Verifying the Setup

To ensure that Tabby is running correctly behind Caddy, execute a curl command against the health endpoint:

curl -L 'http://localhost:8080/v1/completions' \
-H 'Content-Type: application/json' \
-H 'Accept: application/json' \
-d '{
"language": "python",
"segments": {
"prefix": "def fib(n):\n ",
"suffix": "\n return fib(n - 1) + fib(n - 2)"
}
}'

The response should indicate that Tabby is healthy and ready to assist you with your coding tasks.

Securing Your Setup (Optional)

For those interested in securing their setup, consider using Caddy directives like forward_auth and integrating with a service like Authelia. For more details on this, refer to the Caddy documentation on forward_auth.


And there you have it! You've successfully set up Tabby with Caddy as a reverse proxy. Happy coding with your new AI assistant!

As an additional note, since the release of v0.9.0, Tabby enterprise edition now includes the built-in ability to handle replicas and load balancing, with a integrate account management system. For more information, refer to the official documentation for details.

Deploy Tabby in Air-Gapped Environment with Docker

· 2 min read
No internet access

Are you working in an air-gapped environment, and wondering if you can still deploy Tabby? Fear not, because the answer is YES! 🐱📣

Prerequisite📋

  • Docker installed on both the internet-connected computer and the offline computer.

Offline Deployment Guide🐾

Here's how we'll deploy Tabby in an offline environment:

  • Create a Docker image on a computer with internet access.
  • Transfer the image to your offline computer.
  • Run the Docker image and let Tabby work its magic! ✨

Now, let's dive into the detailed steps:

  1. Create a new Dockerfile on a computer with internet access.
FROM tabbyml/tabby

ENV TABBY_MODEL_CACHE_ROOT=/models

RUN /opt/tabby/bin/tabby-cpu download --model StarCoder-1B

The TABBY_MODEL_CACHE_ROOT env var sets the directory for saving downloaded models. By setting ENV TABBY_MODEL_CACHE_ROOT=/models, we instruct Tabby to save the downloaded model files in the /models directory within the Docker container during the build process.

  1. Build the Docker image which containing the model
docker build -t tabby-offline .
  1. Save the Docker image to a tar file:
docker save -o tabby-offline.tar tabby-offline
  1. Copy the tabby-offline.tar file to the computer without internet access.

  2. Load the Docker image from the tar file:

docker load -i tabby-offline.tar
  1. Run the Tabby container
docker run -it \
--gpus all -p 8080:8080 -v $HOME/.tabby:/data \
tabby-offline \
serve --model StarCoder-1B --device cuda

Once the container is running successfully, you should see the CLI output similar to the screenshot below:

Tabby Cli Output

If you encounter any further issues or have questions, consider join our slack community. Our friendly Tabby enthusiasts are always ready to lend a helping paw and guide you to the answers you seek! 😸💡

Running Tabby Locally with AMD ROCm

· 2 min read
info

Tabby's ROCm support is currently only in our nightly builds. It will become stable in version 0.9.

For those using (compatible) AMD graphics cards, you can now run Tabby locally with GPU acceleration using AMD's ROCm toolkit! 🎉

ROCm is AMD's equivalent of NVidia's CUDA library, making it possible to run highly parallelized computations on the GPU. Cuda is open source and supports using multiple GPUs at the same time to perform the same computation.

Currently, Tabby with ROCm is only supported on Linux, and can only be run directly from a compiled binary. In the future, Tabby will be able to run with ROCm on Windows, and we will distribute a Docker container capable of running with ROCm on any platform.

Install ROCm

Before starting, please make sure you are on a supported system and have ROCm installed. The AMD website details how to install it, find the instructions for your given platform. Shown below is a successful installation of ROCm packages on Arch Linux.

ROCm installed on Arch Linux

Deploy Tabby with ROCm from Docker

Once you've installed ROCm, you're ready to start using Tabby! Simply use the following command to run the container with GPU passthrough:

docker run \
--device=/dev/kfd --device=/dev/dri --security-opt seccomp=unconfined --group-add video \
-p 8080:8080 -v $HOME/.tabby:/data \
tabbyml/tabby-rocm \
serve --device rocm --model StarCoder-1B

The command output should look similar to the below:

Tabby running inside Docker

Build Tabby with ROCm locally

If you would rather run Tabby directly on your machine, you can compile Tabby yourself. If compiling yourself, make sure to use the flag --features rocm to enable it.

Once you have a compiled binary, you can run it with this command:

./tabby serve --model TabbyML/StarCoder-1B --device rocm

If the command is used correctly and the environment is configured properly, you should see command output similar to the following:
Tabby running
And enjoy GPU-accelerated code completions! This should be considerably faster than with CPU (I saw a ~5x speedup with StarCoder-1B using a Ryzen 7 5800X and an RX 6950XT).

Completions demo

Deploying a Tabby Instance in Hugging Face Spaces

· 4 min read

Hugging Face Spaces offers an easy-to-use Nvidia GPU hosting runtime, allowing anyone to host their machine learning models or AI applications.

In this blog post, we are going to show you how to deploy a Tabby instance in Hugging Face Spaces. If you have not heard of Tabby, it’s an open-source Github Copilot alternative that supports code completion. Check out more details here.

How it works

Let’s firstly take a look at what steps are needed to deploy a Tabby instance in Hugging Face. It’s super easy and you don’t need much coding knowledge. Buckle up and let’s get started.

Step 1: Create a new Hugging Face Space (link). Spaces are code repositories that host application code.

Step 2: Create a Dockerfile to capture your machine learning models' logic, and bring up a server to serve requests.

Step 3: After space is built, you will be able to send requests to the APIs.

That's it! With the hosted APIs, now you can connect Tabby's IDE extensions to the API endpoint. Next, we will deep dive into each step with screenshots!! Everything will be done in the Hugging Face UI. No local setup is needed.

tip

Looking to quickly start a Tabby instance? You can skip the tutorials entirely and simply create space from this template.

Deep Dive

Create a new Space

After you create a Hugging Face account, you should be able to see the following page by clicking this link. The owner name will be your account name. Fill in a Space name, e.g. "tabbyml", and select Docker as Space SDK. Then click "Create Space" at the bottom.

In this walkthrough we recommend using Nvidia T4 instance to deploying a model of ~1B parameter size.

Create a new Space

Uploading Dockerfile

For advanced users, you can leverage the Git workspace. In this blog post, we will show you the UI flow instead. After you click the "Create a Space" in the last step, you will be directed to this page. Just ignore the main text and click the "Files" on the top right corner.

Docker Space

After clicking on the "Files", you will be able to see a "Add file" button, click that, then click on "Create a new file"

Empty Space

Then you will be redirected to the page below. Set the filename to “Dockerfile” and copy the content to the “Edit” input box. You can copy the code from the appendix here to bring up the SantaCoder-1B model. Once ready, click the button “Commit new file to main” on the bottom.

Edit Dockerfile

Edit Readme

You also need to add a new line the README.md. Click the "edit" button in the README.md file.

Empty README

Add this line "app_port: 8080" after "sdk: docker"

Edit README

Click the button "Commit to main" to save the changes.

Verify Tabby is running

Click on the "App" button, you should be able to see the container is building:

Space Building

If the App is up successfully, you should see this page:

Tabby Swagger

Call code completion API

Now, you are able to call the completion API. The full URL is https://YOUR-ACCOUNT-NAME-tabbyml.hf.space/v1/completions. In this post, the URL is https://randxie-tabbyml.hf.space/v1/completions.

To test if your APIs are up and running, use this online tool to send curl commands:

curl

The complete curl command can also be located in the appendix. Ensure that you have adjusted the URL to align with your Hugging Face Spaces settings!

(If you are setting the space to private, you will need to fill in your Huggingface Access Token as bearer token in HTTP Headers, like Authorization: Bearer $HF_ACCESS_TOKEN.)

Conclusion

In this post, we covered the detailed steps for deploying a Tabby instance to Hugging Face Spaces. By following these steps, anyone is able to bring up their own code completion APIs easily.

Appendix

Dockerfile

FROM tabbyml/tabby

USER root
RUN mkdir -p /data
RUN chown 1000 /data

USER 1000
CMD ["serve", "--device", "cuda", "--model", "TabbyML/SantaCoder-1B"]

CURL Command

curl -L 'https://randxie-tabbyml.hf.space/v1/completions' \
-H 'Content-Type: application/json' \
-H 'Accept: application/json' \
-d '{
"language": "python",
"segments": {
"prefix": "def fib(n):\n ",
"suffix": "\n return fib(n - 1) + fib(n - 2)"
}
}'