
Introducing the Codestral Integration in Tabby

Β· 2 min read

Tabby x Mistral

We are excited to share the integration of Codestral model into Tabby! Codestral has demonstrated exceptional performance across various coding tasks, and we are delighted to support our users in both self-hosting and accessing Codestral through its cloud API. This addition aims to enhance your coding experience with precision and efficiency, setting a new standard for AI-enhanced developer experience.

What's great about Codestral?​

Compared to other coding LLMs, Codestral stands out with its single model that supports both instruction-following and fill-in-the-middle compatibility. This is achieved by fine-tuning the base model on two data sets simultaneously. This dual fine-tuning strategy allows the same model to perform excellently in both code completion and conversational tasks, greatly simplifying the model deployment stack. This highlights an important direction we're extremely excited about from an application perspective, especially in on-prem/byoc use cases.

Besides, Codestral is trained on a diverse dataset of 80+ programming languages, ensuring a high-quality experience for developers working with a wide range of languages.

Get started with Codestral in Tabby​

Self-hosting Codestral​

Codestral-22B is available for both Tabby completion and chat models link. Please follow Tabby Installation to host Tabby and set --model Codestral-22B --chat-model Codestral-22B.

warning

Users need to respect the Mistral AI Non-Production License (MNPL) when using Codestral model. This license allows developers to use the model for non-commercial purposes and to support research work. For other production use cases, a Mistral commercial license is required.

Access via Mistal AI API​

Tabby also supports connecting to Mistral's API Platform. To use Codestral via Mistral's API, you need to first sign up for an API key from Mistral AI. Then in Tabby, set your model configuration as below in ~/.tabby/config.toml file (see more).

Codestral API in Tabby

Rank Fusion for improved Code Context in Tabby

Β· 2 min read

Introduction​

Tabby has made significant advancements in its code context understanding with the introduction of a semantic relevance score (via vector embedding) and rank fusion in version 0.12. These enhancements have transformed the way Tabby ranks source code context, resulting in more accurate context for feeding into LLM.

From BM25 to Rank Fusion​

Tabby's initial approach to ranking involved the use of the BM25 algorithm, as described in Repository context for LLM assisted code completion. This algorithm indexed source code in chunks, which served as the basis for code completion and Q&A. In the latest release, Tabby has augmented this approach with a semantic relevance score calculated from embedding vector distances. This dual scoring system necessitated the implementation of a rank fusion technique to effectively combine these disparate ranks.

The Mechanics of Reciprocal Rank Fusion​

The RRF method adopted by Tabby is a well-established technique in information retrieval. It merges multiple rank lists to produce a single, more accurate ranking. In Tabby, the RRF is applied as follows:

derived from https://www.elastic.co/guide/en/elasticsearch/reference/current/rrf.html
score = 0.0
for q in queries:
if d in result(q):
score += 1.0 / ( k + rank( result(q), d ) )
return score

# where:
# k is a constant, currently set to 60 in Tabby
# q is a query within the set of queries
# d is a document found in the result set of q
# result(q) is the result set for query q
# rank( result(q), d ) is the ordinal rank of document d within result(q)

By introducing the semantic relevance score and rank fusion, Tabby can now provide more accurate code suggestions that are contextually relevant to the user's current work.

For developers using Tabby, the enhanced ranking system requires no additional configuration beyond the repository context setup in the admin UI. The indexing process now includes the computation of embedding vectors, which, while slightly extending the initial indexing time, is mitigated by caching vectors between commits to optimize performance.

Try Explain Code in Code Browser

Repository Context Triggered

Conclusion​

By leveraging a combination of BM25 and semantic relevance scores, Tabby delivers more accurate and contextually appropriate suggestions, streamlining the development process.

As Tabby continues to evolve, users can anticipate ongoing improvements designed to bolster productivity and enrich the coding experience.

Vulkan Support: LLMs for Everyone

Β· 2 min read

It has long been the case that machine learning models are run on the GPU to improve their performance. The GPU is far more effective at the kinds of computations needed for AI than the CPU, and so GPU compute libraries such as Cuda and ROCm are typically used.

However, requiring the support of these libraries can restrict which graphics cards are compatible, leaving many with older or less popular cards unable to run LLMs efficiently.

Tabby is happy to announce that we now support Vulkan, a graphics library created primarily for games. Its original purpose means that it is designed to work on a very broad range of cards, and leveraging it to host LLMs means that we can now offer GPU acceleration to people whose cards are not supported by Cuda and ROCm.

Vulkan works on basically any GPU, so if you have previously been forced to host local models on your CPU, now is the time to see what Tabby with Vulkan can do for you!

Vulkan Installation​

To begin, first make sure that you have Vulkan installed.

For Windows users, Vulkan may be natively supported. Otherwise, the Vulkan SDK can be downloaded at https://vulkan.lunarg.com/sdk/home#windows.

For Linux users, Vulkan can be installed through your package manager:

  • Arch Linux: vulkan-icd-loader (universal), and also install vulkan-radeon (for AMD) or vulkan-nouveau (for Nvidia)
  • Debian Linux: libvulkan1

Vulkan installed on Arch Linux

Tabby Installation​

To start using Tabby with Vulkan, first download one of the pre-built Vulkan binaries for your platform:

Running​

Once you've installed the appropriate binary, you can simply run it from the command line:

For Windows, open a command prompt and navigate to the download folder, then run:

tabby_x84_64-windows-msvc-vulkan serve --model StarCoder-1B --device vulkan

For Linux:

./tabby_x64_64-manylinux2014-vulkan serve --model StarCoder-1B --device vulkan

When it starts, you should see a printout indicating that Vulkan has found your card and is working properly:

Vulkan running on Linux

Now enjoy your speedy completions!

Completion example

Connect Private GitHub Repository to Tabby

Β· 5 min read

A few months ago, we published a blog Repository context for LLM assisted code completion, introducing the Repository Context feature in Tabby. This feature has been widely embraced by many users to incorporate repository-level knowledge into Tabby, thus improving the relevance of code completion suggestions within the working project.

In this blog, I will guide you through the steps of setting up a Tabby server configured with a private Git repositories context, aiming to simplify and streamline the integration process.

Generating a Personal Access Token​

In order to provide the Tabby server with access to your private Git repositories, it is essential to create a Personal Access Token (PAT) specific to your Git provider. The following steps outline the process with GitHub as a reference:

  1. Visit GitHub Personal Access Tokens Settings and select Generate new token. GitHub PAT Generate New Token
  2. Enter the Token name, specify an Expiration date, an optional Description, and select the repositories you wish to grant access to. GitHub PAT Filling Info
  3. Within the Permissions section, ensure that Contents is configured for Read-only access. GitHub PAT Contents Access
  4. Click Generate token to generate the new PAT. Remember to make a copy of the PAT before closing the webpage. GitHub PAT Generate Token

For additional information, please refer to the documentation on Managing your personal access tokens.

Note: For users of GitLab, guidance on creating a personal access token can be found in the documentation Personal access tokens - GitLab.

Configuration​

To configure the Tabby server with your private Git repositories, you need to provide the required settings in a TOML file. Create and edit a configuration file located at ~/.tabby/config.toml:

## Add the private repository
[[repositories]]
name = "my_private_project"
git_url = "https://<PAT>@github.com/icycodes/my_private_project.git"

## More repositories can be added like this
[[repositories]]
name = "another_project"
git_url = "https://<PAT>@github.com/icycodes/another_project.git"

For more detailed about the configuration file, you can refer to the configuration documentation.

Note: The URL format for GitLab repositories may vary, you can check the official documentation for specific guidelines.

Building the Index​

In the process of building the index, we will parse the repository and extract code components for indexing, using the parser tree-sitter. This will allow for quick retrieval of related code snippets before generating code completions, thereby enhancing the context for suggestion generation.

tip

The commands provided in this section are based on a Linux environment and assume the pre-installation of Docker with CUDA drivers. Adjust the commands as necessary if you are running Tabby on a different setup.

Once the configuration file is set up, proceed with running the scheduler to synchronize git repositories and construct the index. In this scenario, utilizing the tabby-cpu entrypoint will avoid the requirement for GPU resources.

docker run -it --entrypoint /opt/tabby/bin/tabby-cpu -v $HOME/.tabby:/data tabbyml/tabby scheduler --now

The expected output looks like this:

icy@Icys-Ubuntu:~$ docker run -it --entrypoint /opt/tabby/bin/tabby-cpu -v $HOME/.tabby:/data tabbyml/tabby scheduler --now
Syncing 1 repositories...
Cloning into '/data/repositories/my_private_project'...
remote: Enumerating objects: 51, done.
remote: Total 51 (delta 0), reused 0 (delta 0), pack-reused 51
Receiving objects: 100% (51/51), 7.16 KiB | 2.38 MiB/s, done.
Resolving deltas: 100% (18/18), done.
Building dataset...
100%|β–ˆβ–ˆβ–ˆβ–ˆβ–ˆβ–ˆβ–ˆβ–ˆβ–ˆβ–ˆβ–ˆβ–ˆβ–ˆβ–ˆβ–ˆβ–ˆβ–ˆβ–ˆβ–ˆβ–ˆβ–ˆβ–ˆβ–ˆβ–ˆβ–ˆβ–ˆβ–ˆβ–ˆβ–ˆβ–ˆβ–ˆβ–ˆβ–ˆβ–ˆβ–ˆβ–ˆβ–ˆβ–ˆβ–ˆβ–ˆ| 12/12 [00:00<00:00, 55.56it/s]
Indexing repositories...
100%|β–ˆβ–ˆβ–ˆβ–ˆβ–ˆβ–ˆβ–ˆβ–ˆβ–ˆβ–ˆβ–ˆβ–ˆβ–ˆβ–ˆβ–ˆβ–ˆβ–ˆβ–ˆβ–ˆβ–ˆβ–ˆβ–ˆβ–ˆβ–ˆβ–ˆβ–ˆβ–ˆβ–ˆβ–ˆβ–ˆβ–ˆβ–ˆβ–ˆβ–ˆβ–ˆβ–ˆβ–ˆβ–ˆβ–ˆβ–ˆ| 12/12 [00:00<00:00, 73737.70it/s]

Subsequently, launch the server using the following command:

docker run -it --gpus all -p 8080:8080 -v $HOME/.tabby:/data tabbyml/tabby serve --model StarCoder-1B --device cuda

The expected output upon successful initiation of the server should like this:

icy@Icys-Ubuntu:~$ docker run -it --gpus all -p 8080:8080 -v $HOME/.tabby:/data tabbyml/tabby serve --model StarCoder-1B --device cuda
2024-03-21T16:16:47.189632Z INFO tabby::serve: crates/tabby/src/serve.rs:118: Starting server, this might take a few minutes...
2024-03-21T16:16:47.190764Z INFO tabby::services::code: crates/tabby/src/services/code.rs:53: Index is ready, enabling server...
ggml_init_cublas: GGML_CUDA_FORCE_MMQ: no
ggml_init_cublas: CUDA_USE_TENSOR_CORES: yes
ggml_init_cublas: found 1 CUDA devices:
Device 0: NVIDIA GeForce RTX 4090, compute capability 8.9, VMM: yes
2024-03-21T16:16:52.464116Z INFO tabby::routes: crates/tabby/src/routes/mod.rs:35: Listening at 0.0.0.0:8080

Notably, the line Index is ready, enabling server... signifies that the server has been successfully launched with the constructed index.

Verifying Indexing Results​

To confirm that the code completion is effectively utilizing the built index, you can employ the code search feature to validate the indexing process:

  1. Access the Swagger UI page at http://localhost:8080/swagger-ui/#/v1beta/search.
  2. Click on the Try it out button, and input the query parameter q with a symbol to search for.
  3. Click the Execute button to trigger the search and see if there are any relevant code snippets was found.

In the screenshot below, we use CodeSearch as the query string and find some code snippets related in the Tabby repository:

Code Search Preview

Alternatively, if you have utilized the code completion with the constructed index, you can examine the server log located in ~/.tabby/events to inspect how the prompt is enhanced during code completion.

Additional Notes​

Starting from version v0.9, Tabby offers a web UI to manage your git repository contexts. Additionally, a scheduler job management system has been integrated, streamlining the process of monitoring scheduler job statuses. With these enhancements, you can save a lot of effort in maintaining yaml config files and docker compose configurations. Furthermore, users can easily monitor visualized indexing results through the built-in code browser. In the upcoming v0.11, a new feature will be introduced that enables a direct connection to GitHub, simplifying and securing your access to private GitHub repositories.

For further details and guidance, please refer to administration documents.

Tabby with Replicas and a Reverse Proxy

Β· 3 min read

Tabby operates as a single process, typically utilizing resources from a single GPU.This setup is usually sufficient for a team of ~50 engineers. However, if you wish to scale this for a larger team, you'll need to harness compute resources from multiple GPUs. One approach to achieve this is by creating additional replicas of the Tabby service and employing a reverse proxy to distribute traffic among these replicas.

This guide assumes that you have a Linux machine with Docker, CUDA drivers, and the nvidia-container-toolkit already installed.

Let's dive in!

Creating the Caddyfile​

Before configuring our services, we need to create a Caddyfile that will define how Caddy should handle incoming requests and reverse proxy them to Tabby:

Caddyfile
http://*:8080 {
handle_path /* {
reverse_proxy worker-0:8080 worker-1:8080
}
}

Note that we are assuming we have two GPUs in the machine; therefore, we should redirect traffic to two worker nodes.

Preparing the Model File​

Now, execute the following Docker command to pre-download the model file:

docker run --entrypoint /opt/tabby/bin/tabby-cpu \
-v $HOME/.tabby:/data tabbyml/tabby \
download --model StarCoder-1B

Since we are only downloading the model file, we override the entrypoint to tabby-cpu to avoid the need for a GPU

Creating the Docker Compose File​

Next, create a docker-compose.yml file to orchestrate the Tabby and Caddy services. Here is the configuration for both services:

docker-compose.yml
version: '3.5'

services:
worker-0:
restart: always
image: tabbyml/tabby
command: serve --model TabbyML/StarCoder-1B --device cuda
volumes:
- "$HOME/.tabby:/data"
deploy:
resources:
reservations:
devices:
- driver: nvidia
device_ids: ["0"]
capabilities: [gpu]

worker-1:
restart: always
image: tabbyml/tabby
command: serve --model TabbyML/StarCoder-1B --device cuda
volumes:
- "$HOME/.tabby:/data"
deploy:
resources:
reservations:
devices:
- driver: nvidia
device_ids: ["1"]
capabilities: [gpu]

web:
image: caddy
volumes:
- "./Caddyfile:/etc/caddy/Caddyfile:ro"
ports:
- "8080:8080"

Note that we have two worker nodes, and we are using the same model for both of them, with each assigned to a different GPU (0 and 1, respectively). If you have more GPUs, you can add more worker nodes and assign them to the available GPUs (remember to update the Caddyfile accordingly!).

Starting the Services​

With the docker-compose.yml and Caddyfile configured, start the services using Docker Compose:

docker-compose up -d

Verifying the Setup​

To ensure that Tabby is running correctly behind Caddy, execute a curl command against the health endpoint:

curl -L 'http://localhost:8080/v1/completions' \
-H 'Content-Type: application/json' \
-H 'Accept: application/json' \
-d '{
"language": "python",
"segments": {
"prefix": "def fib(n):\n ",
"suffix": "\n return fib(n - 1) + fib(n - 2)"
}
}'

The response should indicate that Tabby is healthy and ready to assist you with your coding tasks.

Securing Your Setup (Optional)​

For those interested in securing their setup, consider using Caddy directives like forward_auth and integrating with a service like Authelia. For more details on this, refer to the Caddy documentation on forward_auth.


And there you have it! You've successfully set up Tabby with Caddy as a reverse proxy. Happy coding with your new AI assistant!

As an additional note, since the release of v0.9.0, Tabby enterprise edition now includes the built-in account management system. For more information, refer to the official documentation for details.

Deploy Tabby in Air-Gapped Environment with Docker

Β· 2 min read
No internet access

Are you working in an air-gapped environment, and wondering if you can still deploy Tabby? Fear not, because the answer is YES! πŸ±πŸ“£

PrerequisiteπŸ“‹β€‹

  • Docker installed on both the internet-connected computer and the offline computer.

Offline Deployment GuideπŸΎβ€‹

Here's how we'll deploy Tabby in an offline environment:

  • Create a Docker image on a computer with internet access.
  • Transfer the image to your offline computer.
  • Run the Docker image and let Tabby work its magic! ✨

Now, let's dive into the detailed steps:

  1. Create a new Dockerfile on a computer with internet access.
FROM tabbyml/tabby

ENV TABBY_MODEL_CACHE_ROOT=/models

RUN /opt/tabby/bin/tabby-cpu download --model StarCoder-1B
RUN /opt/tabby/bin/tabby-cpu download --model Nomic-Embed-Text

The TABBY_MODEL_CACHE_ROOT env var sets the directory for saving downloaded models. By setting ENV TABBY_MODEL_CACHE_ROOT=/models, we instruct Tabby to save the downloaded model files in the /models directory within the Docker container during the build process.

  1. Build the Docker image which containing the model
docker build -t tabby-offline .
  1. Save the Docker image to a tar file:
docker save -o tabby-offline.tar tabby-offline
  1. Copy the tabby-offline.tar file to the computer without internet access.

  2. Load the Docker image from the tar file:

docker load -i tabby-offline.tar
  1. Run the Tabby container
docker run -it \
--gpus all -p 8080:8080 -v $HOME/.tabby:/data \
tabby-offline \
serve --model StarCoder-1B --device cuda

Once the container is running successfully, you should see the CLI output similar to the screenshot below:

Tabby Cli Output

If you encounter any further issues or have questions, consider join our slack community. Our friendly Tabby enthusiasts are always ready to lend a helping paw and guide you to the answers you seek! πŸ˜ΈπŸ’‘

Create Tabby extension with Language Server Protocol

Β· 5 min read

Excited to share that Tabby Agent now available on npm and supports running as a language server πŸŽ‰. This new feature provides a uniform protocol to easily integrate Tabby into different text editors. Let's dive deeper together to unfold the stories behind!

What is Tabby Agent​

Tabby Agent is a Node.js package that communicates with the Tabby server and implements several essential features for code completion, including:

  • Debouncing: Tabby Agent handles code completion requests by implementing an appropriate debouncing mechanism. This ensures that requests are not sent too frequently, reducing server load and improving performance, as the automatic inline code completion often listens for text input which can be very frequent.
  • Caching: Tabby Agent prevents redundant completion requests with KV caching. When a completion is dismissed but requested again at the same location, the cached content is used directly. Cached completions are also matched when the prefix of a request aligns with a previously cached completion, no need for additional server requests. This is especially useful when users type the same text as the ghost text suggestions.
  • Post-processing: Tabby Agent enhances completion results through post-processings including filtering out low-quality completions, removing duplicate suggestions, and limiting the length of suggestions to the focused scope. All of these post-processings help users focus on the most relevant suggestions.

These features were initially developed as part of the Tabby VSCode extension. Now it's desirable to reuse the client code logic as Tabby expands to more text editors. Therefore, we are building Tabby Agent as a standalone Node.js package that can be used by other editors to communicate with Tabby.

tabby-agent

Why Language Server​

Tabby Agent previously utilized a customized protocol based on JSON Lines, designed to be compatible with VIM's JSON mode channel. However, this protocol was not widely adopted, making it hard to integrate Tabby Agent to different editors. With a more universal protocol, we can offer a more flexible and streamlined experience in creating Tabby plugins for various editors.

The Language Server Protocol defines a standardized protocol for communication between a language server and its clients. It provides methods to implement a wide range of features, including code completion.

tabby-agent-lsp

Running Tabby as a Language Server provides code completion with the standard textDocument/completion protocol. It can suggest code completions based on the context of the code, whether it's a line or a block, rather than just a single word.

I'm also looking forward to the proposed textDocument/inlineCompletion feature in the upcoming version 3.18 of the LSP Specification. It will provide better support for multi-line code completions. Stay tuned for more updates on this topic in the future!

Running Tabby as a Language Server​

To run Tabby as a language server, follow these steps:

  1. Set up your Tabby server following this documentation.

  2. Make sure you have Node.js version 18 or above installed on your system.

  3. Run the following command in your terminal:

    npx tabby-agent --lsp --stdio

    Follow the instructions displayed in the console. Once the installation is complete, the Tabby agent will start listening for requests on StdIO. If there are no error messages, you can assume that the Tabby Agent script is running correctly. You can stop it by pressing Ctrl+C. npx-run-tabby-agent

    Alternatively, you can install tabby-agent as a global package and run it by using the following command:

    # Install tabby-agent as a global package
    npm install --global tabby-agent
    # Run the agent as a language server
    tabby-agent --lsp --stdio
    # Press `Ctrl+C` to stop the agent
  4. You can configure the agent's settings by editing the config file located at ~/.tabby-client/agent/config.toml. If your Tabby server uses a different port or requires authentication, modify these settings accordingly:

    [server]
    endpoint = "http://127.0.0.1:8080" # Replace with your server's endpoint
    token = "your_token"

    For more details on configuration options, refer to this documentation.

Connect Your Editor to Tabby​

Most text editors support built-in LSP clients or popular LSP client plugins, making it easy to connect them to the Tabby agent language server. Let's take NeoVim and coc.nvim as an example to show you how to configure your editor to connect to Tabby.

  1. Install coc.nvim by following the guide

  2. Start NeoVim, and use the :CocConfig command to open the configuration file. Add the following configuration:

    {
    "languageserver": {
    "tabby-agent": {
    "command": "npx",
    "args": ["tabby-agent", "--lsp", "--stdio"],
    "filetypes": ["*"]
    }
    }
    }

    The "filetypes": ["*"] setting enables Tabby for all filetypes. You can modify it according to your needs.

  3. Save the configuration file, and restart NeoVim.

  4. Open a file and start typing code to see code completion suggestions from Tabby.

coc-tabby-completion

For more examples of connecting Tabby to other editors, refer to the Tabby Agent documentation. If you have configurations for your favorite editors that you'd like to share, feel free to submit a pull request!

Create a Plugin for a New Editor​

In the previous examples, Tabby completions are displayed in the dropdown completion list. However, this method may not be very convenient for displaying multi-line code completions. As most LSP clients do not yet support inline completion, you may want to create a plugin for an editor that provides inline completion. To demonstrate how to communicate with Tabby via LSP, we have provided an example project here.

Please note that language server support is still in its early stages, and your feedback will be invaluable in making it even better. If you have any ideas or suggestions, feel free to create an issue or join our Slack community.

Happy coding with Tabby! πŸ±πŸ’»

Running Tabby Locally with AMD ROCm

Β· 2 min read
info

Tabby's ROCm support is currently only in our nightly builds. It will become stable in version 0.9.

For those using (compatible) AMD graphics cards, you can now run Tabby locally with GPU acceleration using AMD's ROCm toolkit! πŸŽ‰

ROCm is AMD's equivalent of NVidia's CUDA library, making it possible to run highly parallelized computations on the GPU. Cuda is open source and supports using multiple GPUs at the same time to perform the same computation.

Currently, Tabby with ROCm is only supported on Linux, and can only be run directly from a compiled binary. In the future, Tabby will be able to run with ROCm on Windows, and we will distribute a Docker container capable of running with ROCm on any platform.

Install ROCm​

Before starting, please make sure you are on a supported system and have ROCm installed. The AMD website details how to install it, find the instructions for your given platform. Shown below is a successful installation of ROCm packages on Arch Linux.

ROCm installed on Arch Linux

Deploy Tabby with ROCm from Docker​

Once you've installed ROCm, you're ready to start using Tabby! Simply use the following command to run the container with GPU passthrough:

docker run \
--device=/dev/kfd --device=/dev/dri --security-opt seccomp=unconfined --group-add video \
-p 8080:8080 -v $HOME/.tabby:/data \
tabbyml/tabby-rocm \
serve --device rocm --model StarCoder-1B

The command output should look similar to the below:

Tabby running inside Docker

Build Tabby with ROCm locally​

If you would rather run Tabby directly on your machine, you can compile Tabby yourself. If compiling yourself, make sure to use the flag --features rocm to enable it.

Once you have a compiled binary, you can run it with this command:

./tabby serve --model TabbyML/StarCoder-1B --device rocm

If the command is used correctly and the environment is configured properly, you should see command output similar to the following:
Tabby running
And enjoy GPU-accelerated code completions! This should be considerably faster than with CPU (I saw a ~5x speedup with StarCoder-1B using a Ryzen 7 5800X and an RX 6950XT).

Completions demo

Introducing the Coding LLM Leaderboard

Β· 2 min read

In our previous post on Cracking the Coding Evaluation, we shed light on the limitations of relying on HumanEval pass@1 as a code completion benchmark. In response, we've launched the Coding LLMs Leaderboard, embracing Next Line Accuracy as a metric inspired by academic works such as RepoCoder, RepoBench, and CCEval.

Leaderboard

But what exactly is line accuracy? In code completion, model predicts a block of code spanning multiple lines. A naive approach would involve comparing the predicted block with the actual code being committed directly. While this approach might seem ideal, it is often considered "too sparse" as a revealing metric. On the other hand, next-line accuracy serves as a dependable proxy for overall block match accuracy.

Next Line Accuracy

Only content inside red box are used to compared with ground truth to compute accuracy metric

CCEval utilizes the next statement, but based on our observations, it strongly correlates with next line exact match. Therefore, we've opted for next line accuracy due to its ease of implementation across languages, eliminating the need for language-specific Tree Sitter parsers.

For data preparation, our initial release exclusively leverages the dataset from CCEval. This dataset provides well-structured left context, right context, cross-file context with BM25, and oracle information.

At present, evaluation is limited to prefix text + cross-file context. Our future plans involve more in-depth analyses:

  1. Comparing accuracy in completing a function's argument list.
  2. Computing accuracy in completing a function's docstring.

We genuinely believe that this leaderboard can assist Tabby's users in navigating the tradeoff between service cost, quality, and other factors. We are committed to enhancing and refining this leaderboard in the future.

Cracking the Coding Evaluation

Β· 7 min read

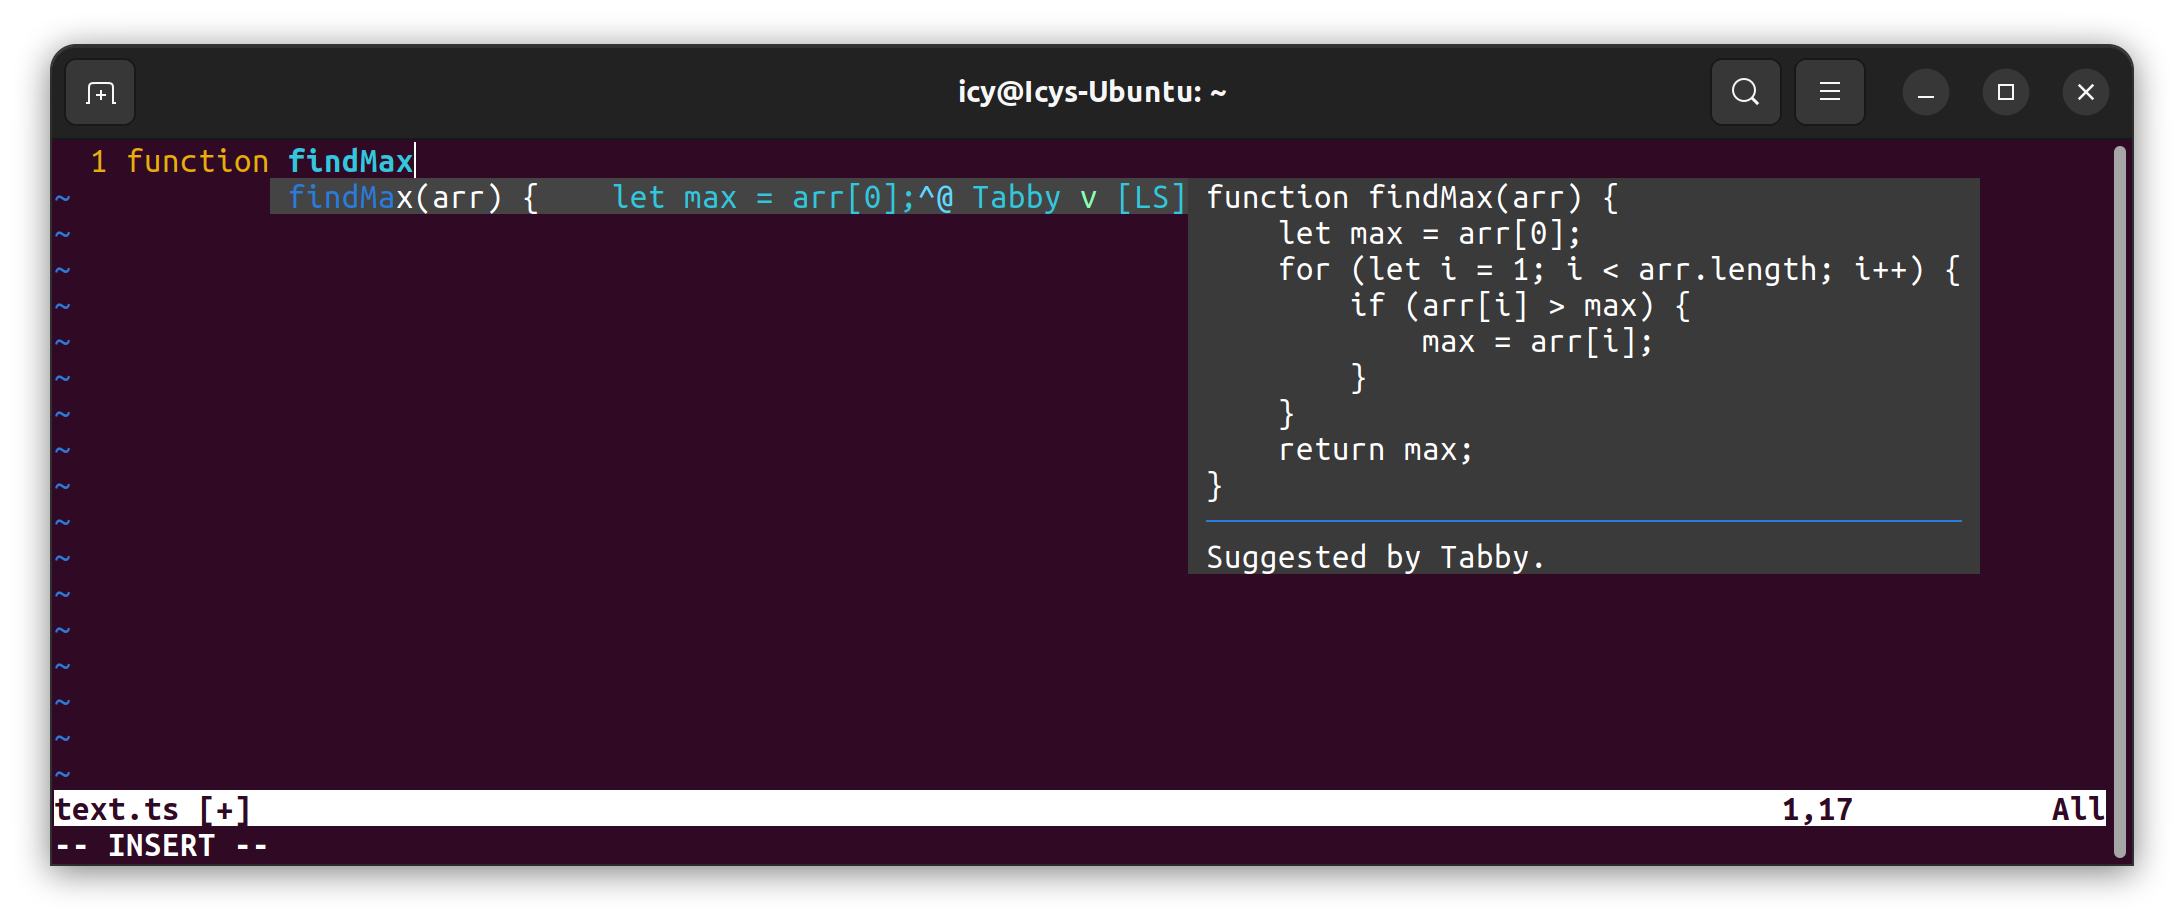
Tabby offers an open-source alternative solution to GitHub Copilot with easy setup and self-host options. We embrace an open ecosystem to support major open source coding LLMs (e.g. StarCoder, CodeLlama, WizardCoder, etc.), and enable easy integration of proprietary models. In addition, Tabby performs retrieval-augmented code completion to suggest code from your private codebase. We firmly believe in the continuous advancement in open source coding LLMs, yet we need quantitative measurements to guide the direction of product improvement, and help developers decide their model of choice.

Evaluation coding LLMs has also been a hot topic in academics. Many different metrics targeting different coding tasks have been proposed over the past year. At Tabby, we prioritize on metrics that best resemble real-world development workflow, and of course, the metrics should be constructed with non-biased data sources. In this blogpost, we will discuss our thoughts for desired code completion benchmarks, and also review latest academic progress in this area.

Exisiting Paradigms​

Existing coding LLM benchmark mostly focus on Pass@k metric - generating k code samples and measuring how often the results successfully pass given unit tests. OpenAI initially introduced this metric in Evaluating Large Language Models Trained on Code in July 2021, along with the release of HumanEval bechmark dataset.

πŸ€– HumanEval​

HumanEval is a hand-crafted dataset, consisting of 164 Python programming problems with unit tests. An example task looks like:

from typing import List 

def below_zero(operations: List[int]) -> bool:

"""
You're given a list of deposit and withdrawal operations on a bank account that starts with zero balance. Your task is to detect if at any point the balance of account fallls below zero, and at that point function should return True. Otherwise it should return False.

>>> below_zero([1, 2, 3]) False

>>> below_zero([1, 2, -4, 5]) True

"""

HumanEval was a pioneer research effort, but now suffers from some unfortunate drawbacks:

  1. Data is likely contaminated. HumanEval dataset has been around for over two years and it has been discussed and documented widely online. The latest coding LLMs are likely to have included its test data in training data crawling, which would make the evaluation no longer valid.

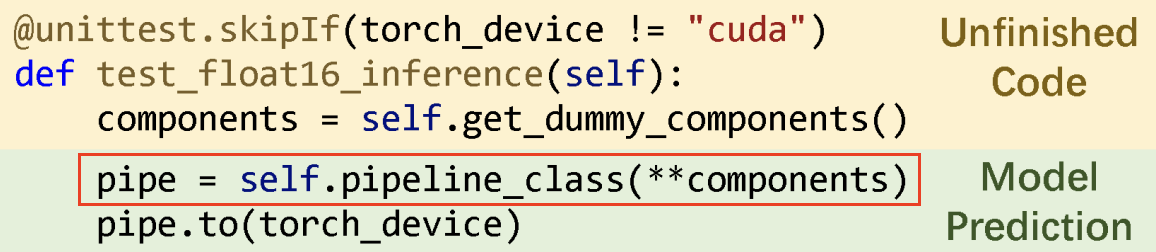
  2. Trivial coding questions that aren't mimicing real engineering setups. HumanEval includes mostly LeetCode's interview-style questions, where they include a single function for LLMs to fill in the body. In a more realistic corporate setup, developers often add code in multiple files in a single PR, and constantly refer to functions implemented in other files. These are indeed more interesting yet challenging tasks for LLMs to perform, but are critical scenarios for AI coding assitants to land in enterprises.

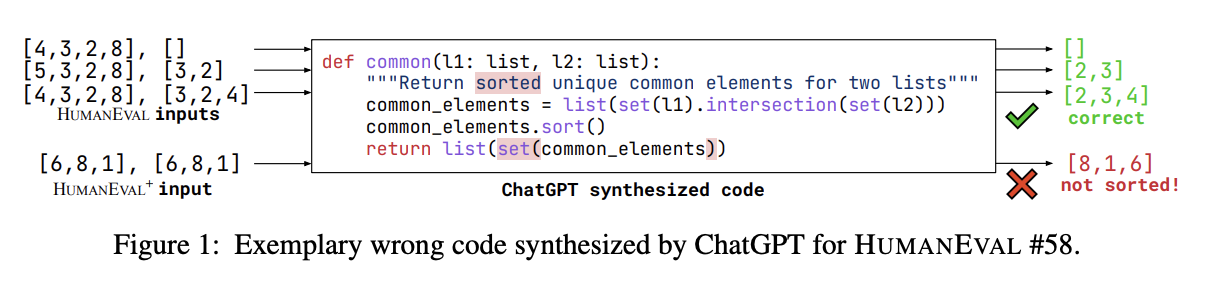
  3. Unit tests are too weak. Researchers noticed that test cases in HumanEval tasks (on average 7.7 tests per problem) aren't enough to guarantee the correctness of the generated code (e.g. a wrong implementation could still pass all existing tests), and thus augmented test cases in HumanEval benchmark by 80x in HumanEvalPlus.

human-eval-plus

  1. Limited coverage in programming languages. This one is obvious as HumanEval only includes Python code. We ❀️ all programming languages!

🧩 Mostly Basic Programming Problems (MBPP)​

MBPP is another popular benchmark for code generation. Researchers from Google introduced it in the paper Program Synthesis with Large Language Models in August 2021, one month after the release of HumanEval. It contains 974 entry-level Python (as the name clearly suggests) programming tasks. An example looks like:

   """
Write a python function to remove first and last occurrence of a given character from the string.

"assert remove_Occ(\"hello\",\"l\") == \"heo\""
"assert remove_Occ(\"abcda\",\"a\") == \"bcd\""
"assert remove_Occ(\"PHP\",\"P\") == \"H\""

"""

Unlike HumanEval, MBPP targets basic tasks commonly encountered by engineers, such as string manipulation, simple arithmetic, and basic data structure operations. However it still faces similar drawbacks as HumanEval mentioned above.

What we are looking for in coding LLM evaluations?​

πŸ”¬ Scientific and Relevant Setup​

The top thing in our mind is metric setup. Like mentioned above, most existing coding LLM evaluations focus on function-level code generation - given a docstring or a function signature at most, the LLM is expected to generate the entire function body.

Here are what we think a trustworthy evaluation setup should cover:

  1. Non-trivial code. Definitely no more Leetcode-style coding questions! The ideal evaluation should target projects with substantial engineering complexity. Evidences like lines of code, number of files, or number of contributors could serve as good indicators to estimate the code complexity.

  2. Cross-file references. This is a key factor to differentiate a more reliable and practical evaluation from something that only scratches the surface of the coding world. Engineers do not code in silo, but are greatly encouraged to reuse a function or API implemented in the existing codebase.

  3. Code completion. Code completion is the most widely adopted LLM-powered feature in developer tools. Millions of developers worldwide have employed AI code completions in their daily workflow. Tabby provides a low-barrier solution in code completion, and is committed to continue to improve the end-to-end product quality.

βš–οΈ Ease and Low-Cost to Run​

The ease and cost to run evaluations is directly correlated to the number of models we can evaluate, and the frequency we can afford to update the results (in the case of refreshed evaluation date, for example). There are efforts to leverage crowdsourcing to rate the quality of LLM responses (e.g. Glaive arena) which excels at receiving high-quality human feedbacks and provides valuable insights to understand user behaviors. However it's harder to scale crowdsourcing ratings and takes longer to receive results. We are iterating quickly on Tabby, and decided that scalability and ease are critical to us now.

πŸ” Data Quality and Inclusion​

The data quality is critical to maintain the legitimacy of such evaluation. Here's what's important for evaluation data:

  1. Train/Eval Data Split. It's one of the most important concepts in your Machine Learning 101 course. Yet often times it gets so basic that folks neglect the challenges to ensure it in real-world applications over time. For example, HumanEval started as a manually drafted dataset to firmly ensure the data separation. Nevertheless over time, it still faces data contamination issue.

  2. Evaluation Quality. HumanEvalPlus mentioned above is a great example for this. Understanding the quality of the evaluation is important for developing a fair sense of the true model performance. We also encourage continuous efforts in improving evaluation quality!πŸ’ͺ🏻

  3. Data Inclusion / Coverage. In the case of coding, inclusion includes efforts like increasing the support of different programming languages. In practice, choosing the reasonable ratio of each programming language is also tricky yet important.

Highlights of recent research innovations​

In this section, we showcase a few recent research work of from the academics toward building reliable and sound evaluations for coding LLMs. Following these papers, we observe a growing emphasize in evaluating coding LLMs with repository-level context, which indeed aligns with what we have been looking for.

πŸ—‚οΈ CrossCodeEval: A Diverse and Multilingual Benchmark for Cross-File Code Completion​

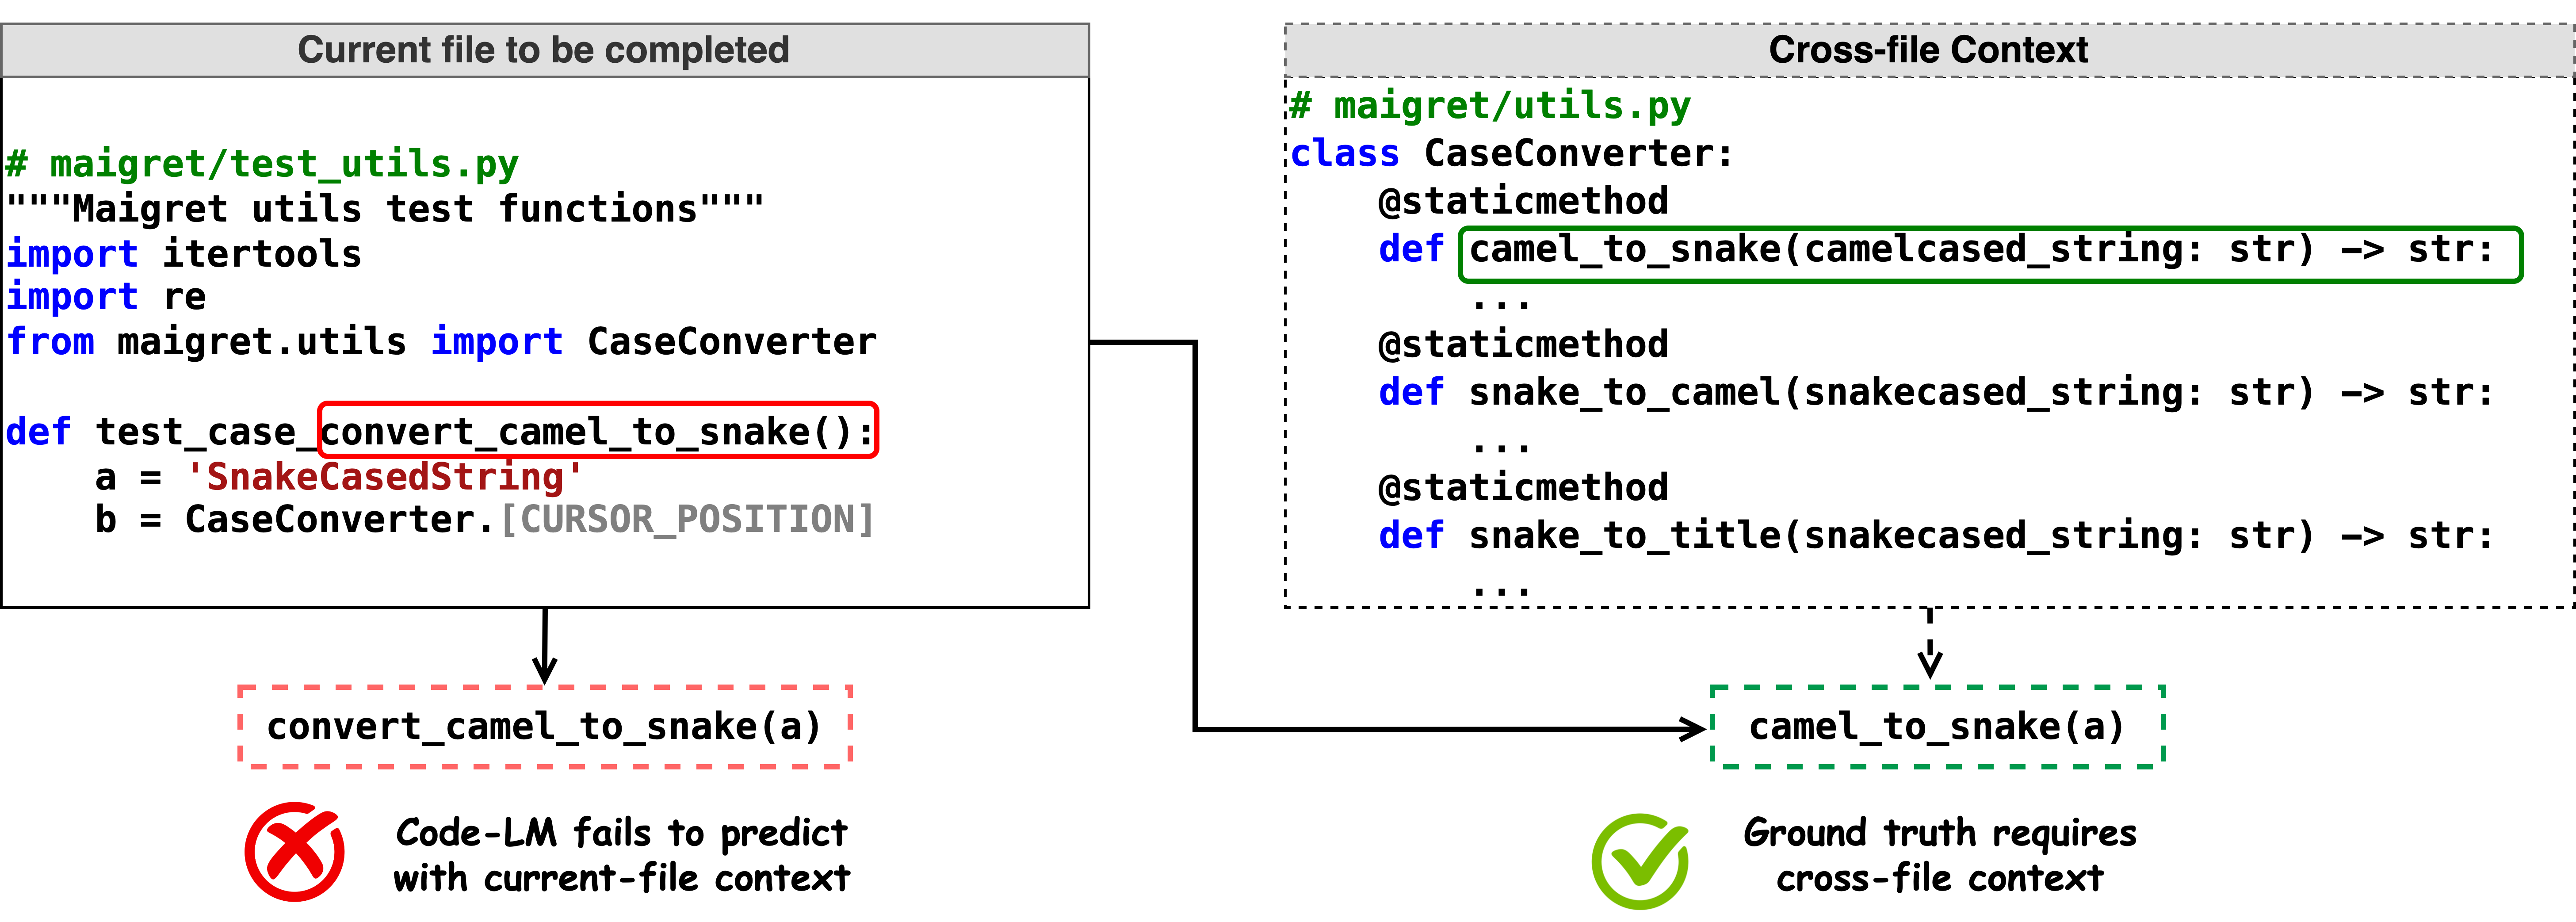
CrossCodeEval benchmark specially targets to address the gap that "existing code completion datasets such as HumanEval and MBPP mostly focus on single-file tasks, neglecting the real-world complexity of multi-file software projects". To achieve this goal, CrossCodeEval uses a static-analysis-based method to strictly require cross-file context for accurate code completion. Experiments show that cross-file context improves end-to-end system performance (LLM + code retriever), yet there's still a lot of room to improve.

cceval

πŸ§ͺ RepoBench: Benchmarking Repository-Level Code Auto-Completion Systems​

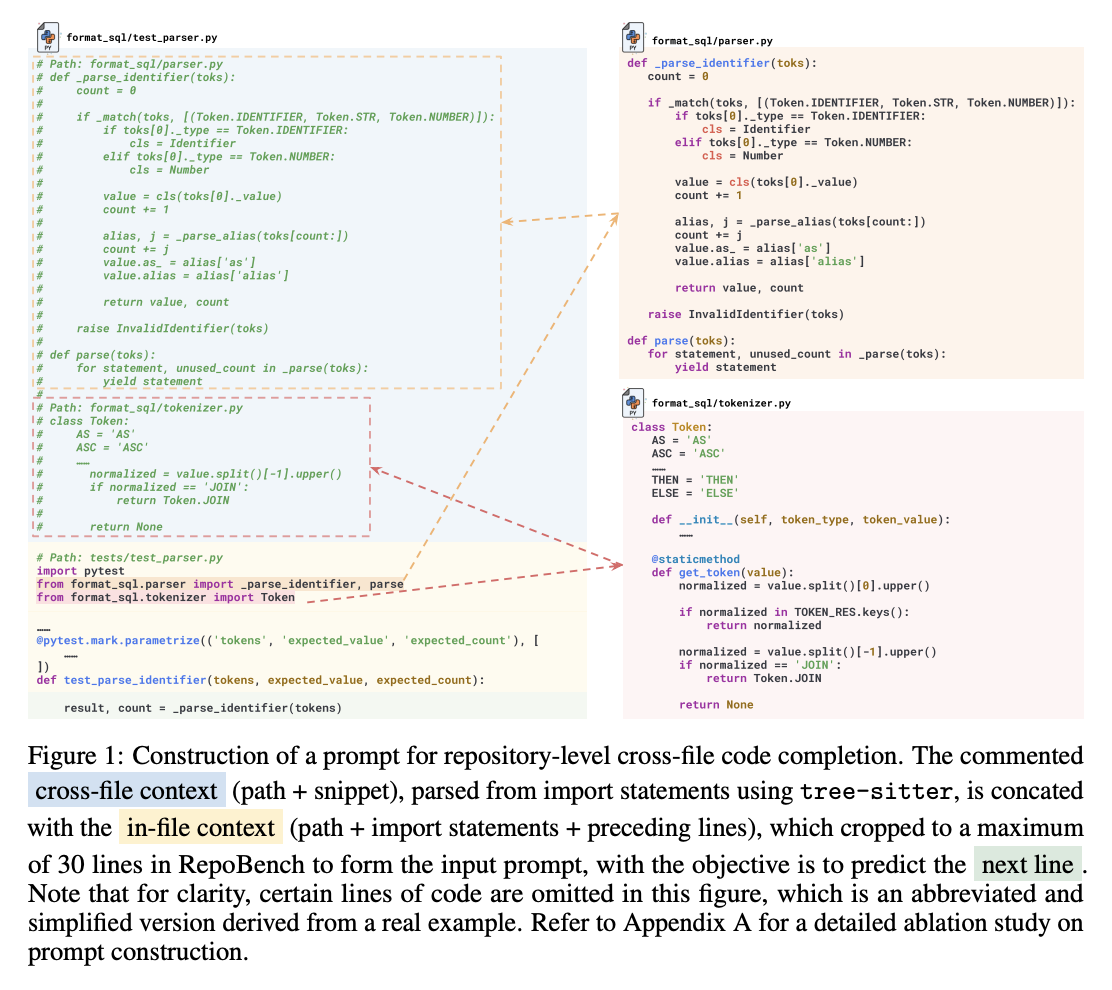
RepoBech also recognizes that current benchmarks primarily focus on single-file tasks, which creates a gap in assessing these systems in more complex, real-world, multi-file programming scenarios. Therefore, RepoBench introduces three interconnected evaluation tasks: RepoBench-R (Retrieval), RepoBench-C (Code Completion), and RepoBench-P (Pipeline) to measure the quality of each module and also the end-to-end system.

repobench

πŸ’Ύ RepoCoder: Repository-Level Code Completion Through Iterative Retrieval and Generation​

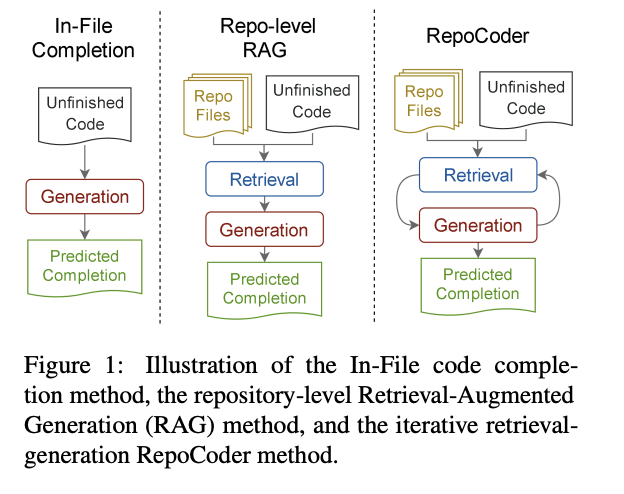
RepoCoder presents an innovative approach of combining similarity-based retriever and LLM prediction into an iterative retrieval-generation pipeline. To demostrate the effectiveness of this method, authors also introduced RepoEval, covering scenarios like line, API invocation, and function body completion from high quality real-world repositories.

repocoder